MagIC Help Library |
|||
|
|
|||
2 MagIC Website
2.1 Uploading Data
2.1.1 Using the Contribution Wizard
The MagIC Contribution Wizard is a step-by-step interface to create and update your contributions to the MagIC database. It is intended to be an intuitive tool for you to use.
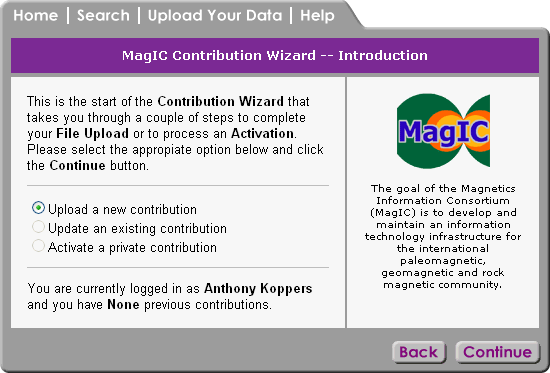
To proceed, you need to select the appropriate option:
Select the New contribution option if you are not going to update one of your existing contributions, or if this is your first contribution to the MagIC database.
Update an Existing Contribution
When you choose to update an existing contribution, you must upload the ASCII text file (*.txt) and Microsoft Excel file (*.xls) associated with the contribution. In most cases, an update will be necessary if some of the information in the existing contribution has been changed, or information has been added. You will be given a list of your previous contributions on the Reload Previous Contribution page. Select the contribution you wish to edit.
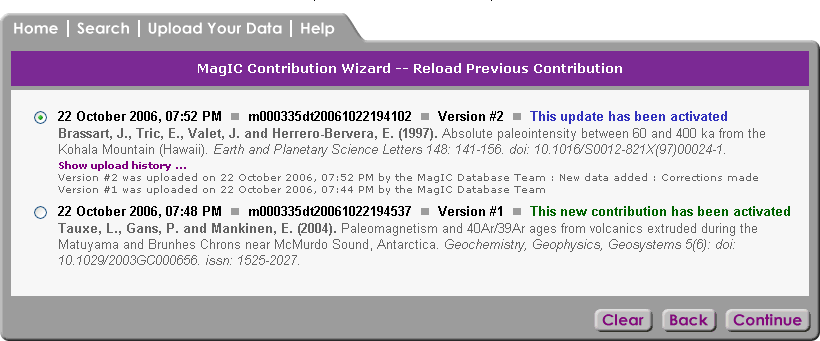
Changes will take effect immediately upon completion of the contribution process, and will be available for users to view. If your contribution is listed as In Progress on the Reload Previous Contribution page, it is not yet available for users to view, since the final confirmation page was not reached on your previous contribution visit. You must complete the entire process in order for your contribution to be available for users to see.
The Reload Previous Contribution form allows you to select one of your existing contributions to update.
A list of your existing contributions is given, with the most recently updated or created first. Contributions are grouped five per page, so if you have made more than five contributions, you will need to use the page navigation links at the bottom of the form to locate the desired contribution.
Each contribution is listed with the date contributed or updated, along with a unique identifier string and the contribution's status. A status of Completed indicates that you completed the entire process for that contribution, and it is currently available for users to view in search results. In Progress indicates that some steps in the process have not yet been completed for that contribution, so in order for users to view it, it must be completed. Updated indicates that the contribution was completed at some point, and that you have subsequently updated some of its data.
Other information is provided to help you differentiate your contributions. Each citation to which the contribution is linked is listed in the standard citation format, including its author(s), year published, title, and journal and DOI information, if applicable.
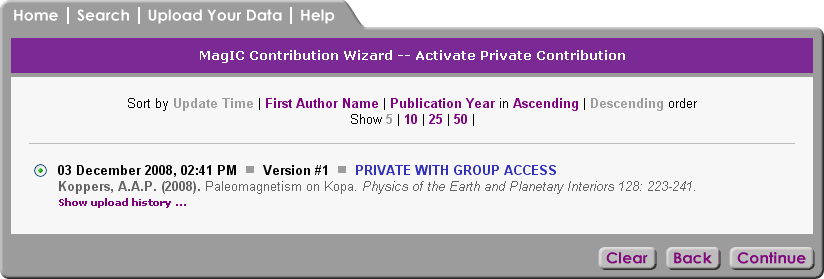
Activate a Private Contribution
If this is your first contribution to MagIC, you will only be able to select the New contribution option.
All steps in the contribution process, along with the final confirmation step, must be completed in order for your contribution to be made available to users of the database. Once your contribution is in the database, you may update it at any time. If you do not complete your contribution, it will be removed from the database and you will need to upload it again.
In order to make a contribution, you must first log in. If you do not yet have a username and password, select the "login" option at the top right of your main browser window. From there, you may create a profile, username, and password.
Select the New contribution option if you are not going to update one of your existing contributions, or if this is your first contribution to the MagIC database.
When you choose to update an existing contribution, you must upload the ASCII text file (*.txt) and Microsoft Excel file (*.xls) associated with the contribution. In most cases, an update will be necessary if some of the information in the existing contribution has been changed, or information has been added. You will be given a list of your previous contributions on the Reload Previous Contribution page. Select the contribution you wish to edit.
Changes will take effect immediately upon completion of the contribution process, and will be available for users to view. If your contribution is listed as In Progress on the Reload Previous Contribution page, it is not yet available for users to view, since the final confirmation page was not reached on your previous contribution visit. You must complete the entire process in order for your contribution to be available for users to see.
2.1.2 Logging In
You must be logged in to make or update a contribution to MagIC. If you are not currently logged in, you will be automatically taken to the User Authentication screen, where you can enter your username and password. From there, you will be taken to the next step in the contribution process.
If you have not yet created a profile, you may follow the appropriate link from the User Authentication screen or click on the Register tab in the main browser window. This will take you to a simple form to enter your contact information and to create a username and password. The identification of contributors and their addresses is an integral part of scholarly data archiving and this information is continuously updated in the EarthRef.org address register. EarthRef.org does not distribute address information to third parties. You may read the entire EarthRef Privacy Policy by clicking on the Disclaimer link from the home page.
Some of the contact information given in your profile will be displayed when a user views your contributions, and from Mailing List searches.
2.1.3 Uploading Files
Two files must be uploaded for each contribution, and both are output from the MagIC Console Software. One file is a Microsoft Excel (*.xls) file, which contains a spreadsheet for each table in the database into which your data will be inserted. The other is an ASCII text (*.txt) file containing information that the upload programs need to be able to add your information to the database.
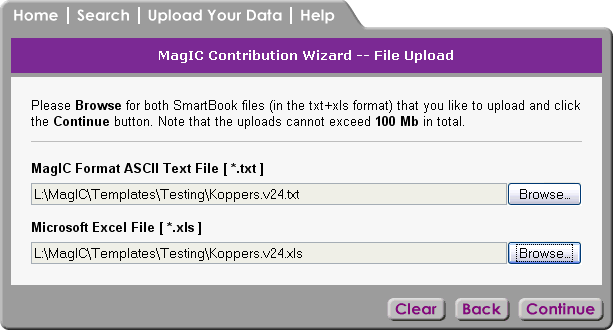
Uploading a file is accomplished in the standard fashion through your browser. Clicking the Browse... button will cause a dialog box to display, allowing you to browse for the desired file on your local computer or network. Once the file is selected, the file name will be automatically filled in beneath the upload field.
If either of the required files is missing from the upload, you will get an error message asking you to upload both files. In addition, if one of the files has become corrupted and can not be read, your upload will not be possible and you will receive an error message.
After clicking the Continue button, you will immediately see a progress bar showing the status of your upload. Because MagIC contribution files may contain several thousands of records and may therefore be very large, the file upload may take a moment. Please do not click the Continue button a second time since this will force the upload procedure to begin again and will delay your upload.
Upon successful upload, you will automatically be taken to the next step in the contribution process.
2.1.4 Selecting Main Reference ''This Study'' for Your Contribution
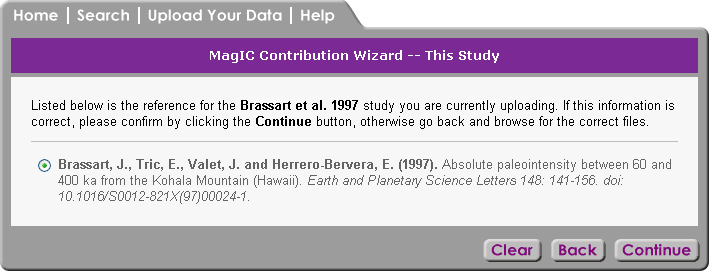
Upon successful file upload, you must first verify the main reference to which your contribution will be linked. If an exact match to the reference is found in the database (either by DOI or author list, year, and title), or the Contribution Wizard did not find any similar matches, you will see a screen like the one below in which one reference is listed. You need only click the Continue button to verify that this is the correct reference.
2.1.5 Selecting Additional References
After you have verified the main reference (This study) to which your contribution will be linked, the Contribution Wizard will process all other reference information included in your uploaded files. As with the main reference, the Wizard will attempt to find exact matches to the references.
If all references are found in the database (either by DOI or author list, year, and title) and no errors are found, you will not need to verify any information. Instead, you will automatically be taken to the next step. If neither an exact match nor similar matches are found in the database, the Contribution Wizard will insert the new reference.
If, however, the Contribution Wizard can not find an exact match but finds similar references, you will see it listed with one or more possible existing database matches, followed by the reference in your contribution. In most cases, there may only be a slight spelling or other variation between the existing reference and the one in your contribution, and you will need to verify that the highlighted reference is indeed the correct one to which your contribution should be linked. The Contribution Wizard tries to find the best match to your contribution's reference, but you must confirm the reference before proceeding.

It is always best to select the existing database reference, even if you find slight variations in the spelling. This is because other data in the database may already be linked to it, and the existing reference data will most likely be much more complete than the reference in the contribution file. You may contact EarthRef.org to update the variation in the database. If you choose to add the new reference instead of using the existing one, the reference data that you provided in the MagIC software will be inserted into the database.
Occasionally, there is some data missing from the uploaded file because it has not been completed in the MagIC software prior to the creation of the upload files. In this case, you will see any problem references listed at the bottom of this screen to alert you to the fact that these references will not be matched to your contribution. It is best in this case to refer to your data in the MagIC program and to complete it as best you can. Once fixed, you may return to the Contribution Wizard to update the contribution. You may, however, choose to continue without correcting the references and update the contribution at a later time. Until then, your contribution will not be linked to the problem references.
2.1.6 Selecting Mailinglist Entries
Your data for people associated with the contribution you are uploading will be inserted into the EarthRef.org address book. The Contribution Wizard will perform a check to see whether these individuals already exist in the database. If a match is found for each individual, or no similar entries already exist, the mailinglist data will be automatically processed and you will not see this step.
If, however, an exact match can not be found for one or more individuals, and one or more similar entries are found, you will be asked to select the best match for each individual. As with the reference data, the difference between the information in your contribution and that in the database may be a simple spelling difference. If that is the case, it is always best to select the existing entry, as its data will be more complete, and it may already be linked to other data in the database. You must select the most appropriate entry and click the Continue button to process these records.
2.1.7 Data Parsing
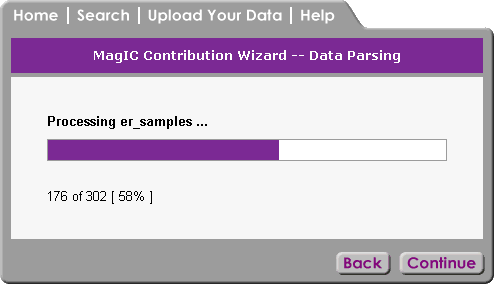
Most of the data in your contribution (aside from reference data) will be processed in the Data step of the Contribution Wizard. In most cases, this will consist of inserting thousands of records into many database tables, which can take several minutes.
So that you will know where in the data processing stage the Contribution Wizard is, you will see a status bar like the one in the screen below. For each table in your contribution files, you will see a status bar indicating the current record being processed. The status bar image illustrates visually where each record lies, and below the bar is a numeric indication of the record.

If an error is found during the data processing, the processing will not continue. You will see a message indicating what the problem is so that you may fix it in your MagIC program data. Once fixed, you may return to the Contribution Wizard to update your contribution.
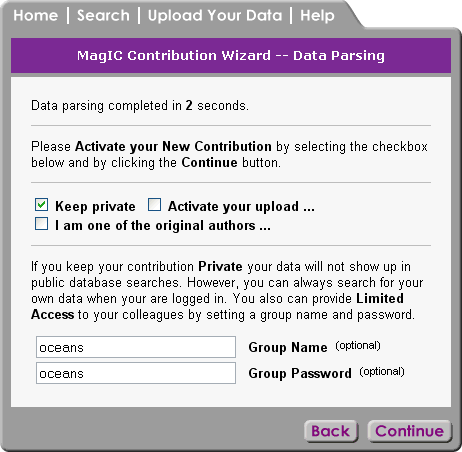
2.1.8 Activating Your Contribution
After processing is complete, you will see a confirmation message stating the number of seconds processing took, along with instructions for activating your contribution. Please note that even though your data has been inserted into the database, you must verify that you want to activate it by checking the checkbox on this screen. This is done to allow you to decide when your contribution will be activated. If, for example, an error was found at some point in the contribution process, or you decide you would like to update some of the data and re-upload the files, you may choose to wait until you have the updated data files to activate your contribution.
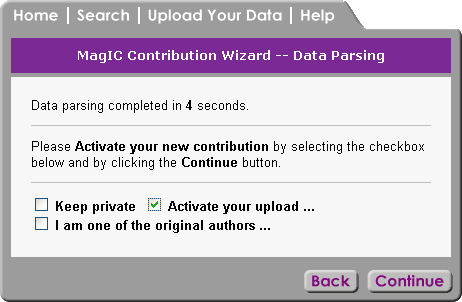

Activate Contribution with Global Access
If you continue without selecting the option to confirm the activation, your contribution will remain in the database temporarily, but will be unavailable for users to see. It will be removed from the database within 48 hours and it will not appear in your list of existing contributions.
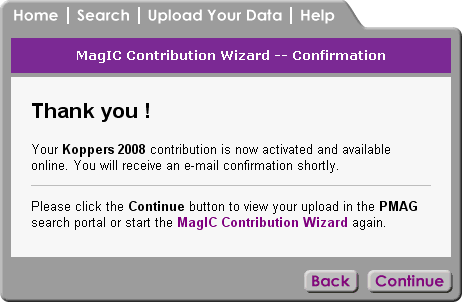
If you have checked the "Activate this contribution" checkbox on the previous screen, your contribution will be activated in this step, making your data available to users. You will again see a status bar indicating which table is currently being activated. The process will take only a few seconds.
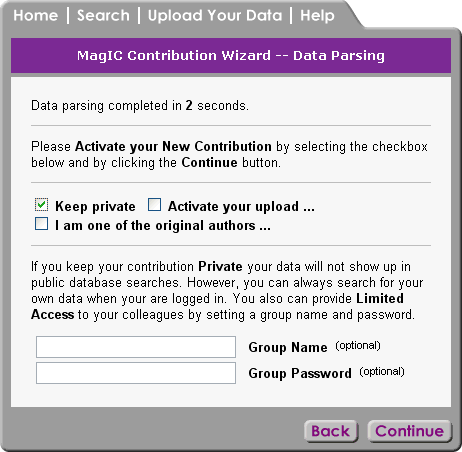
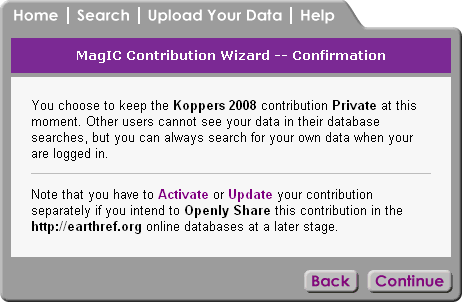
Keeping Contribution Private with Group Access
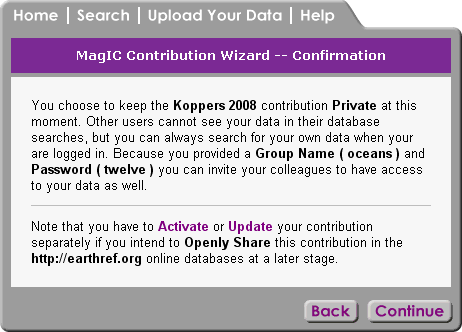
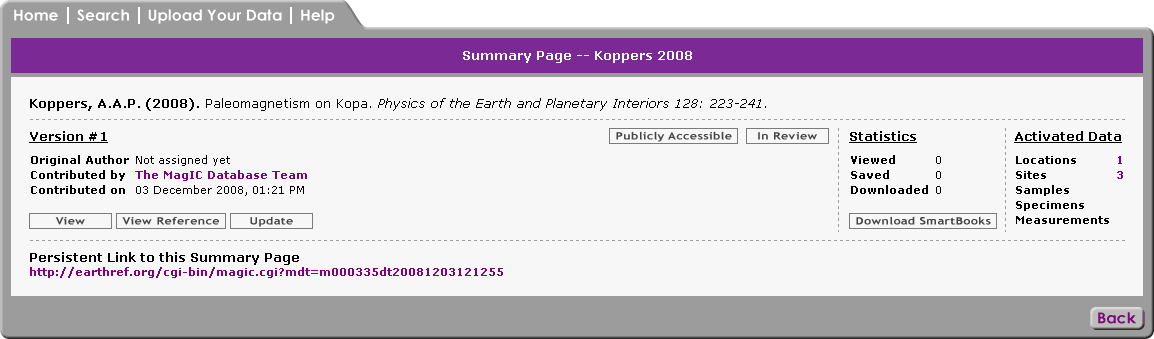
In this final step, a confirmation e-mail will also be sent to the e-mail address provided in your user profile, and will include a link to a summary page of your contribution data, a link to the main citation referred to in your contribution, and a reminder of your username and password.
Once activation has completed, you will see a confirmation message. At this time, your the contribution process is complete, and your data is available for users to see.
2.1.9 Summary Page
If you did not select the "Activate this contribution" checkbox on the previous page, your contribution will not be activated in this step, and instead of a status bar you will see a message alerting you to this fact. If you forgot to check the checkbox, simply click the Back button to return to the previous step, check the checkbox, and click the Continue button. The process will then proceed as described above.
2.2 Searching the Web Portals
Finding, collecting and downloading paleomagnetic and rock magnetic data from the MagIC Database is important for most users. In this Chapter we explain the different search functionalities you can find on the MagIC Home Page and in its Search Portals. For more detailed information on searching we refer to the Online MagIC Help Library at http://earthref.org/MAGIC/help.htm.
2.2.1 MagIC Website Home Page
Start by visiting the http://earthref.org/MAGIC home page, from where you can launch the PMAG and RMAG search portals, manage your own contributions, find important web links, a list of the most recent contributions, and read the latest news about paleo and rock magnetism.
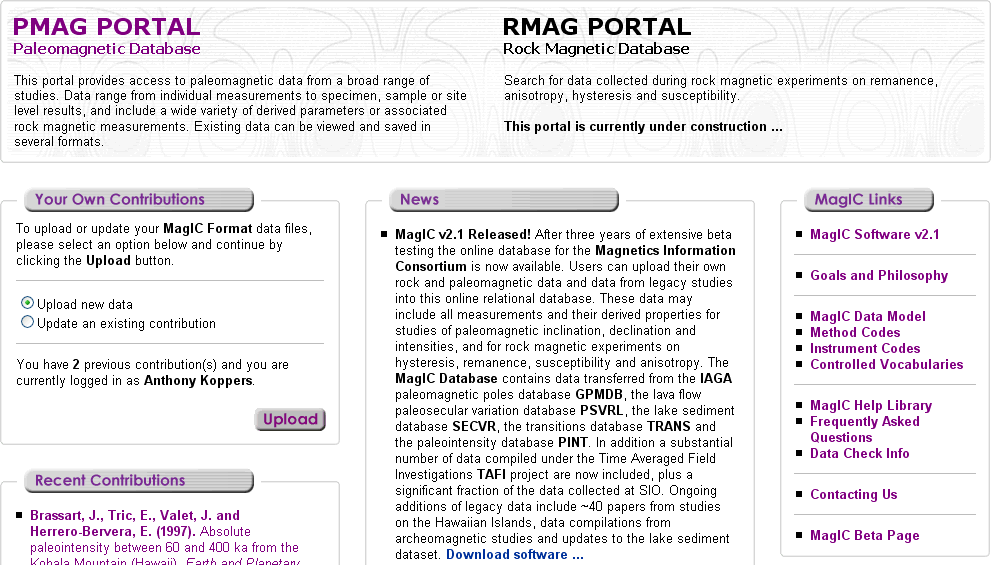
2.2.2 The PMAG Portal
The PMAG and RMAG web portals form separate entry points for paleo and rock magnetic searching. Although you can carry out different kind of searching, both portals interrogate the same underlying EarthRef.org and MagIC Databases. For this reason, you can find rock magnetic data when searching in the PMAG Portal and paleomagnetic data when searching in the RMAG Portal. The portals merely are different starting points that are tailored to the needs of either magnetic community.
Below, we show you the resulting Measurement List from a particular drill down search in the PMAG Portal. As can been seen from this example, we drilled down from McMurdo to the actual measurements on Specimen mc01a. In this view of the data you can link back to the Tauxe et al. 2004 paper in the EarthRef.org Reference Database, you can use the links in the upper left of this listing to navigate back through your drill down history, and you can use the Save, Plot and Options pull down menus for more advanced functionality.
Note that the Units of the data are given between brackets in the Header of this table. All units are SI based, except for some fields, such as geological age. If you mouse over the headers, a longer explanation is given in a popup balloon. If you mouse over any of the cells in the table, a similar popup balloon is shown that contains the header information, as well as the basic information that is displayed in the left most column (experiment info in this example). This functionality will help you to better navigate larger data tables or when you show the table in Expanded View (see below).
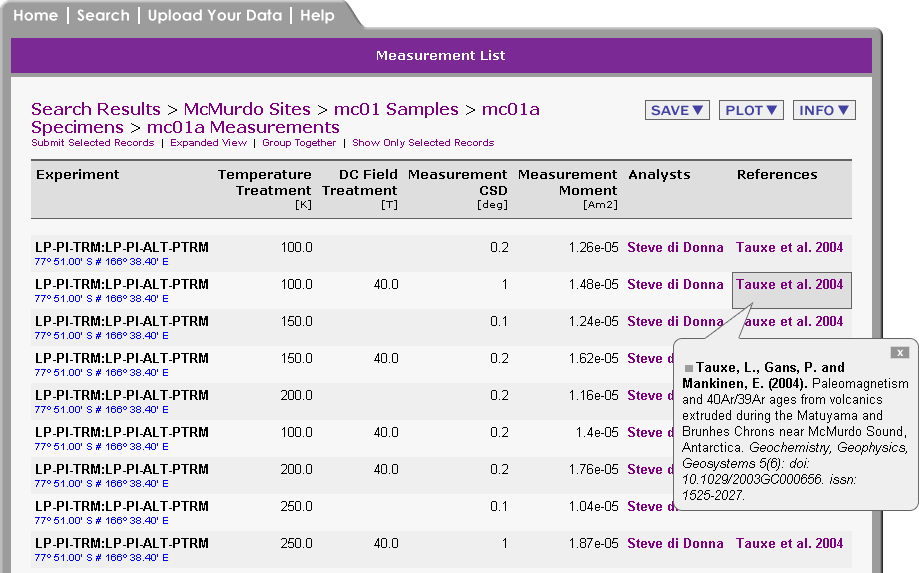
In the above example only data from the Basic View is shown. You can select the Expanded View from the links to the upper left. If you do so, all available data for each particular measurement are shown. In the near future you will have the ability to set your own Search Preferences, in which you can predefine what columns are shown in both the Basic and Expanded Views, and in what units you want to view your search results. For example, you will be able to set your preferences to always show ages in Ma and paleointensities in µT instead of the default T.
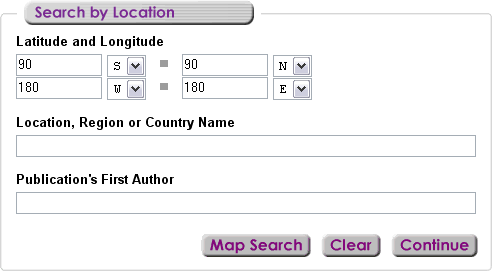
In the PMAG Portal one can search by location, which allows you to drill down from any location to the actual measurement data. You can do so by providing a lat-lon box, keywords to find a certain location by name, the last name of the first author, or a combination of these searches. You can also perform a map search by clicking on the Map Search button.
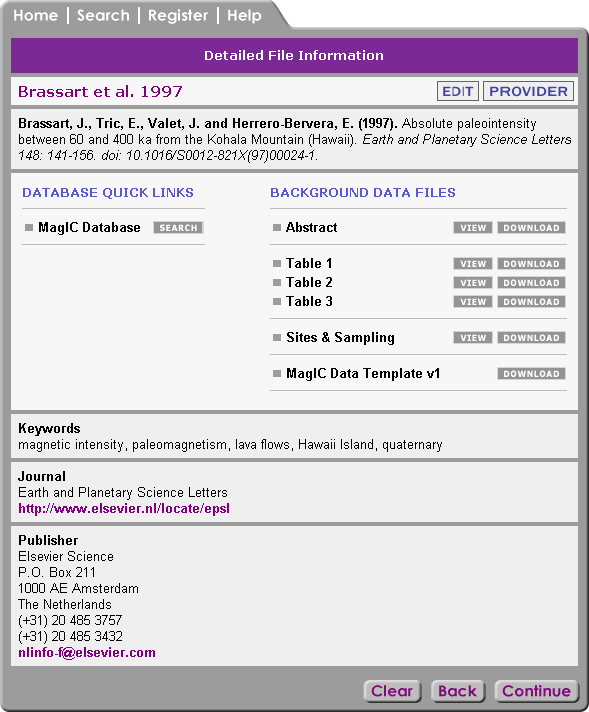
Searches by reference will provide you with a Detailed Reference Information table (see below) for a given publication. From this table you can view and download various Background Data Files, including the Microsoft Excel© and text versions of the MagIC SmartBooks. This table also provides Quick Links to the MagIC and other EarthRef.org databases, when these exist. In addition, a link may appear to the Provider of the publication, which redirects you to the Full Length HTML version of the paper on the publishers website. From here you can download a PDF of the publication, provided you or your institution has access to the journal or publication in question.
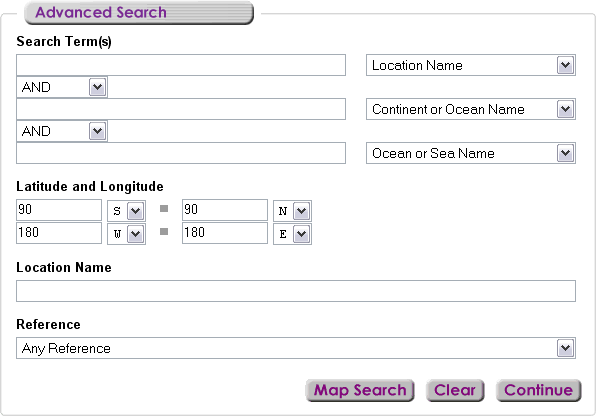
In the PMAG Portal you can also perform a more advanced search, which allows you to combine various Boolean searches terms. These terms normally are an accumulation of all other standard searches. You can also perform a map search by clicking on the Map Search button.
2.2.4 Plotting and Visualizations
Many Plotting and Visualization options are available through the Plot menu. In the plots and maps that you can generate at the MagIC Website all data from a single results table are included. If a results page contains more than one table, you can always Group Together the tables and make a new plot with all combined data. All plots can be saved as PNG (image) or SVG (scalable vector graphics).
These plotting tools will be expanded considerably in the future, allowing different kinds of experiments and data to be plotted, such as Rock Magnetic measurement plots (hysteresis loops, FORC diagrams, etc) and Stratigraphic Section and Drill Core plots. The ultimate goal is to make these plots and maps of good publication quality, to deliver them as SVG (already available), and to make the plotting more interactive so that you can access the results of different averaging scheme's or data selections.
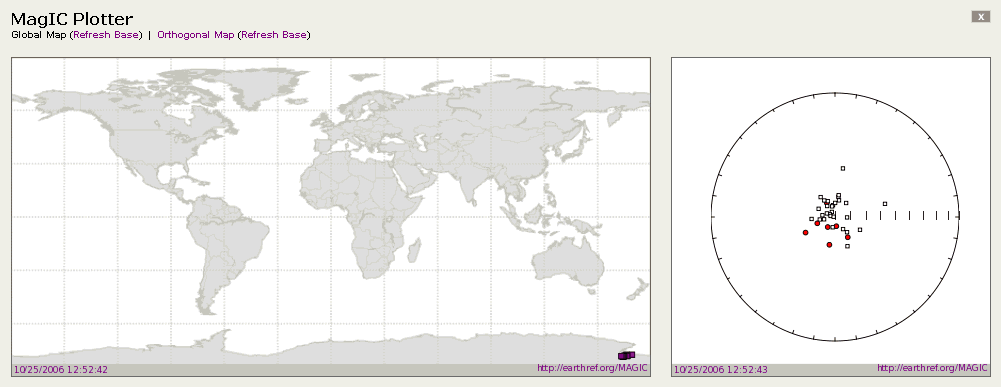
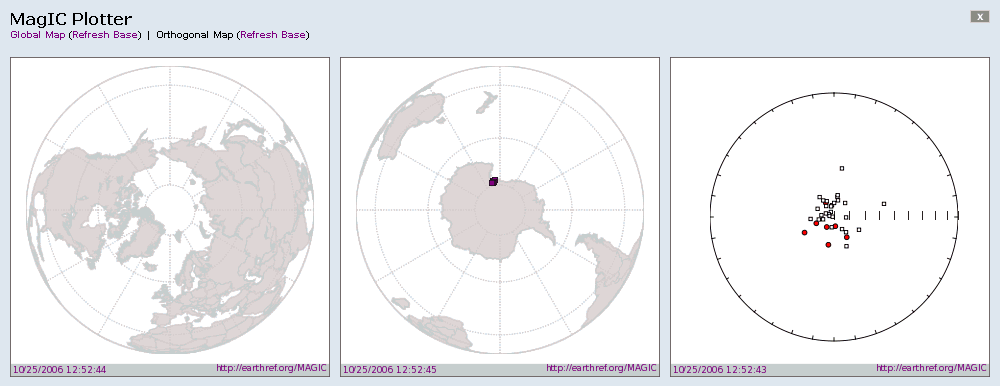
Global Maps and Orthographic Projections
On the Location, Site, Sample, Specimen and Measurement levels you can generate maps that plot their latitude-longitude positions. Global Maps (see the image above) are available as well as Orthographic Projections (below) in order to view data around the poles. Both map views are combined with an Equal Area plot.
On the Measurement level you can plot various other diagrams, such as typical Zijderveld, Thellier and Arai plots. These plots (see below and next page for some examples) are drawn from the data residing in the database and provide a good view of the data itself and the quality of the experiments carried out.


2.3 Error Messages
2.3.1 Invalid File Type
The error "Invalid file type" will appear if one or both of the files uploaded are incorrect. The most common reason for this is inserting the Microsoft Excel file (*.xls) in the ASCII Text file (*.txt) upload field and vice versa. Simply click the Back button and insert the correct file into each field.
If you are certain that the correct file is in each upload field, a more serious issue may be the cause for this error. One of your files may be corrupt or can otherwise not be read correctly by the Contribution Wizard. In this case, it is suggested that you contact the webmaster for assistance.
2.3.2 Unable to Move File to Directory
The error "Unable to move [file] to [directory]" is a serious but uncommon error that may occur during contribution upload. It is a problem on the server side, and is not a consequence of a user action or corrupt file. When this error occurs, the webmaster is immediately notified, and the problem will be resolved. It is suggested that you contact the webmaster and you will be notified when the problem has been corrected.
2.3.3 Unable to Find File
The error "Unable to find [file]" occurs during data parsing when data is expected for a particular table but is not included in your contribution. The most common cause for this error is that it was not included in your input into the MagIC Console software. It is recommended that you return to the Console to complete your data input and then return to the Contribution Wizard.
If you are certain that the data input into the MagIC Console software is complete, please contact the webmaster with a description of the problem.
2.3.4 Missing Data for Reference
The error "Missing data for [reference]" occurs during the reference step when some data for a particular reference is incomplete. The missing data will be described with the error message. The most common cause for this error is that it was not included in your input into the MagIC Console software. It is recommended that you return to the Console to complete your data input and then return to the Contribution Wizard.
If you are certain that the data input into the MagIC Console software is complete, please contact the webmaster with a description of the problem.
See also ...
Contents MagIC Chapter 1 Introduction Chapter 3 MagIC Console Software Chapter 4 Importing Data With PmagPy and MagIC.py Chapter 5 MagIC Glossary