MagIC Help Library |
|||
MagIC Help Library |
|||
3.5 Function by Function
3.5.1 Operations Menu
To open a new MagIC SmartBook file, choose the New File ... command (or ctrl-N) in the Operations menu. In a dialogbox you will be asked to Save the SmartBook File under your name of choice. The NewFile.xls is a default name that you can overwrite, as necessary. When clicking on the Save button, a new and empty MagIC SmartBook is created with 30 predefined tables (worksheets).

To open a MagIC SmartBook, choose the Open Existing File ... command (or ctrl-O) in the Operations menu. In a dialogbox you will be asked to browse and select the SmartBook file you would like to re-open in the console software.
Select the Close ... or the Close All ... commands in the Operations menu to close the active MagIC SmartBook file(s). Upon closing the console software will ask you to save the file(s) first.
Click the Save ... command (or ctrl-S) in the Operations menu to save the active MagIC SmartBook file. This command has the same functionality as the Save button on the left-hand side of the toolbar itself. Clicking Ctrl Shift and the Save button [Windows platform only] will save the SmartBook file after cleaning up and reformatting all tables.
Click the Import Data Files ... command (or ctrl-M) in the Operations menu to import Standard MagIC Text Files with data to include in the SmartBook tables. An Import Data Files dialogbox appears in which you can browse for these standard text files. You can select multiple text files by holding down the Ctrl or Shift keys [Windows platform only]. When clicking on the Open button, the selected file(s) will be opened and the data will be imported into the MagIC SmartBook tables.
If the data in the Standard MagIC Text File to import don't have the expected format, an error message will appear. Note that data in a column with a misspelled Oracle Name will be ignored while importing the data. The software will give you an error message.

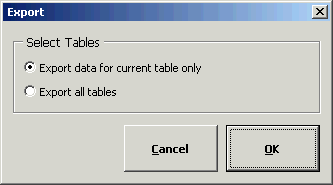
Click the Export command (or ctrl-E) in the Operations menu to export Standard MagIC Text Files. You will be asked to export data for the current (active) table only, or to export all tables in the entire MagIC SmartBook file. All data will be exported into a single tab delimited text file with your chosen file name.
To automatically Import data and immediately Prepare for Uploading (see above) choose the Batch Processing ... command from the Operations menu. You will be asked to select one or more Standard MagIC Text File(s) [multiple files are only allowed on the Windows platform] after which the data processing starts without any user interaction. If errors occur during the five Data Checks they will not cause a prompt, but instead they will be written to an Error Log. This is an efficient option if you prepare Standard MagIC Text Files outside of the MagIC Console Software and you only want to pass your data through the console to make them ready for uploading. Since all checks get performed without any interrupting for your entire data contribution, the error logs give you a good overview where you should improve on your data and metadata collection.
When all data have been entered in the MagIC SmartBook choose the Prepare for Uploading command (or ctrl-F) in the Operations menu. You will be asked for be asked for a confirmation. If you click the Yes button, five Data Checks will first be performed before the data is saved in a single tab delimited text file. This may take several minutes, depending on the complexity and the amount of data stored in the SmartBook. Clicking the No button will cancel this action.
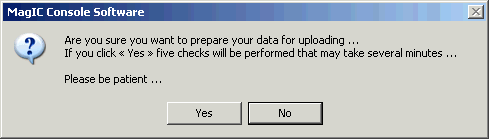
The five Data Checks include a SmartBook integrity check, a check for orphaned data, a general data check, a specific data check (for longitudes, citation style, data ranges, etc.) and an integrity check for all related data fields. If one of these checks returns an error, the Prepare for Uploading command will ask you to edit (or add) certain data and metadata. If you do not edit the particular field at this stage, you will cancel the Prepare for Uploading action.
After the succesfull completion of the Prepare for Uploading command you are ready to upload your data on the MagIC Website. Goto http://earthref.org/MAGIC/upload.htm or click on the Upload Into MagIC Database command in the Operations menu.
3.5.2 Special Menu
The widths of all columns in a table may be automatically adjusted to Autofit the five header rows using the Autofit Columns command in the Special menu.
To clear all the data in a table (worksheet) choose the Clear Table command in the Special menu. You will be asked for a confirmation.
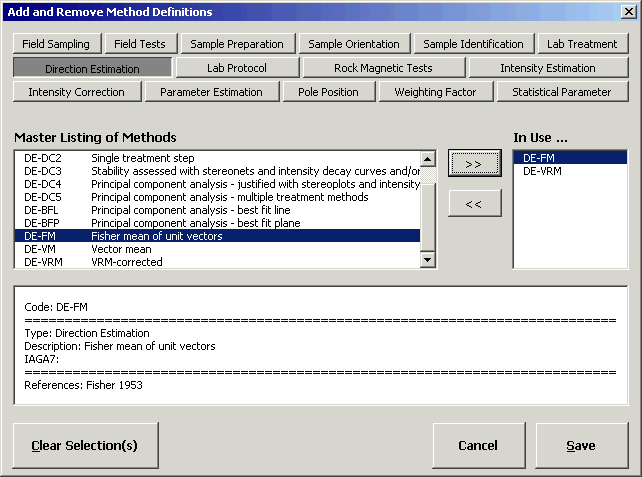
Add and Remove Method Definitions ...
Each MagIC Project only requires a limited number of Method Definitions. By clicking on the Add and Remove Method Definitions ... command in the Special menu you can generate a list of Method Codes that describe the methods used in your project, including field sampling techniques, lab protocols, parameter estimations, and more (see the buttons at the top of this dialogbox for a complete list of categories). The Method Codes that are currently stored in your MagIC SmartBook file are listed in the In Use ... list box shown on the right-hand side.
You can Add new Method Codes by first selecting a method from the master listing of methods list box on the left-hand side, followed by clicking the right-pointing Double Arrow button. Show different categories of the Method Codes in this master listing by clicking on the Category Buttons in the top of this dialogbox.
You can Remove the Method Codes one-by-one by selecting the code in the In Use ... list box, followed by clicking the other left-pointing Double Arrow button. You can remove all methods at once by clicking on the Clear Selection(s) button. The program will ask you for a confirmation.
When you are finished compiling your list of Method Codes, click the Save button. This action will store all newly assigned Method Codes in the MAGIC_methods table, and it will add the appropriate references to the ER_citations table.
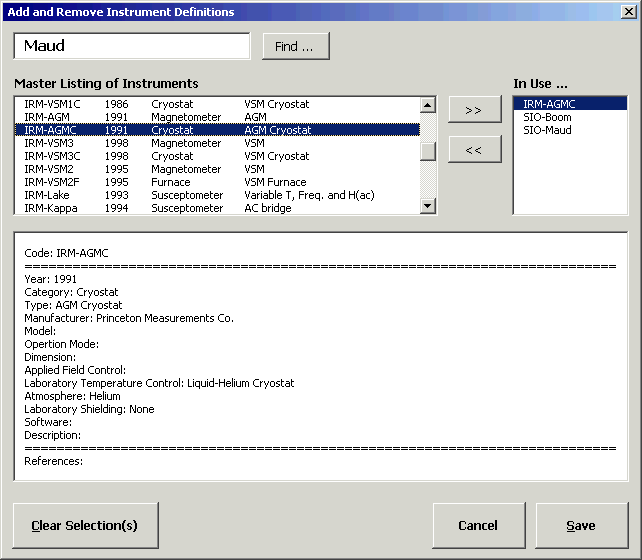
Add and Remove Instrument Definitions ...
Each MagIC Project only requires a limited number of Instrument Definitions. By clicking on the Add and Remove Instrument Definitions ... command in the Special menu you can generate a list of Instrument Codes that describes the instruments used in your project. The Instrument Codes that are currently stored in your MagIC SmartBook file are listed in the In Use ... list box shown on the right-hand side. The Instrument Codes should all start with an abbreviation indicating the host institution.
You can Add new Instruments by first selecting an instrument from the master listing of instruments list box on the left-hand side, followed by clicking the right-pointing Double Arrow button. You can search for Instruments by typing in (part of) a name in the top textbox, followed by clicking on the Find ... button.
You can Remove the Instruments one-by-one by selecting the code in the In Use ... list box, followed by clicking the left-pointing Double Arrow button. You can remove all instruments at once by clicking on the Clear Selection(s) button. The program will ask you for a confirmation.
When you are finished compiling your list of Instruments, click the Save button. This action will store all newly assigned Instrument Codes in the MAGIC_instruments table, and it will add the appropriate references to the ER_citations table.
Some names, such as Location, Site, Sample and Specimen names appear in more than one place in the MagIC SmartBooks. Use the Synchronize Names function in the Special menu to automatically pre-fill these names throughout all the tables. This requires that you have at least filled out these names in one of the SmartBook tables. When new records are added to these tables they will appear in highlighted "light blue", "pink" and "purple" cells for easy detection. You can remove the formatting again by pressing Ctrl Shift S or when you Prepare for Uploading.
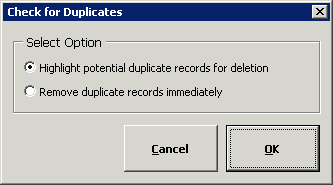
You can detect and remove Duplicate Data Records in your tables by choosing Remove Duplicate Data Records from the Special menu. It is recommended that you first Highlight duplicate records. If you select this option, the potential duplicates get highlighted with an "orange" color. If you opt to Remove the duplicates immediately, the duplicate record(s) will be deleted from you table instead, while the first instance will be retained. Note that this action cannot be undone.
You can detect and remove Empty Data Records by choosing Remove Empty Data Records from the Special menu. You will be asked to remove empty data record for the current (active) table only, or to do so for all tables in the entire MagIC SmartBook file. Note that this action cannot be undone.
![]()
Combine Two Similar Data Records
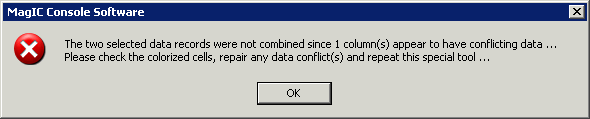
In some cases, tables may have sets of data records that are very similar, where they for example have the same sample number, but one data record (i.e. row) contains inclination and declination data, and another one only paleointensity data. These data records could be combined (i.e. merged) into one record. In order to do so, select two similar data records in a table and choose Combine Two Similar Data Records from the Special menu. If there are no data conflicts, the rows will be combined on the first row and the second row gets deleted. If the data cannot be combined, an error message is displayed and the data conflicts are highlighted in "orange" colors. To select two rows in your table, push the control key and click on any cell to select the first and second row. Note that this action cannot be undone.
To verify that the data in one table have the expected format, choose the Check Data Records command in the Special menu. You will be asked to check data for the current (active) table only, or to check all tables in the entire MagIC SmartBook file.
You can also verify whether specific data (like latitudes, longitudes, citations, magnetic moments, paleointensities, flags) have the expected format and range of values. Some automatic repairs will be performed in the background (e.g. recasting longitudes from the -180/180 to the 0/360 notation) during this data check, other checks may return error messages. To perform this function, choose the Check Specific Data Records command in the Special menu. You will be asked to check data for the current (active) table only, or to check all tables in the entire MagIC SmartBook file.
To validate whether data in one table are correctly related with other data tables in the SmartBook file, choose the Check Data Integrity command in the Special menu. You will be asked to check data for the current (active) table only, or to check all tables in the entire file. This action will search each table for existing relations and it will check them against their parent tables. If a relation is broken (i.e. the parent record does not exist, or you misspelled the daughter or parent record) then an error will occur. You will be asked to edit certain data and metadata.
3.5.3 Data Entry and Editing Dialogbox
There are various ways to enter your data in the MagIC SmartBooks. One of these methods is the Edit Data option (or Ctrl Shift D) that you can find on the main MagIC Toolbar. In this dialogbox you can enter, edit and delete data on a record-by-record basis. If you want to edit an existing data record, first select the data record you want to edit by selecting any cell in its row in the Microsoft Excel© table, followed by clicking on the Edit Data button. You can also Double-Click on the cell. The complete record will be loaded in the dialogbox and will be ready for editing. Use the numbered Tabs on the upper left-hand side to show additional fields, if more than 15 data fields are available for a record.
Note that you can edit all fields, but your changes will only be applied to the MagIC SmartBook when you click the Close button, when you move through your records by using the Next and Previous buttons, or when clicking the New Record button. Temporary changes can be undone by Canceling the dialogbox.
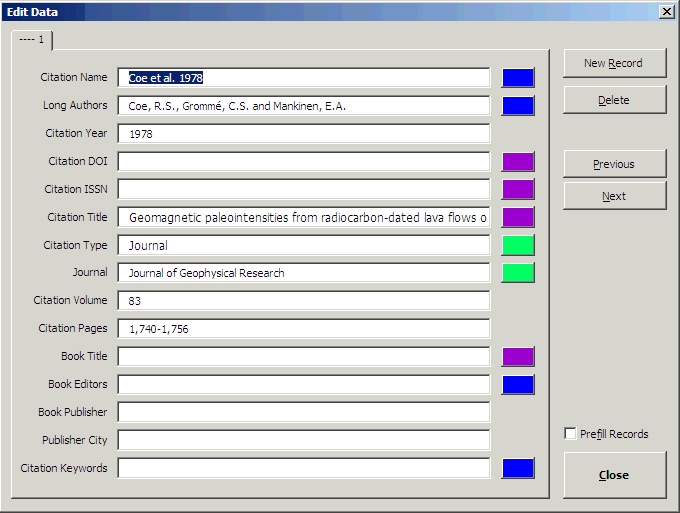
To add a new record click the New Record button. With this action a new record is inserted at the bottom of the active table.
To delete the currently loaded data record from the MagIC SmartBook table click on the Delete button. You will be asked for a confirmation. Deletions cannot be undone.
To move between adjacent data records click on the Previous or Next buttons. You can also make use of the Alt P and Alt N shortcut keys for faster navigation. Note that each data record preloaded in the Edit Data dialogbox is checked automatically, when you move to the next or previous data record, or when closing the dialogbox.
If you checked the Prefill Records checkbox, this new record will be pre-filled with the data from the currently-selected data record in the active table. Use this functionality when adding data records that have the majority of their data field entries in common. This might significantly improve the speed of data entry for larger data sets.
Tab Navigation and Hot Buttons
To facilitate the efficient editing of your data in the Edit Data dialogbox, you can make use of the colored Hot Buttons on the right-hand side of this dialogbox, which will open Pop-Up dialogboxes (see below for two examples). These Hot Buttons can be divided into 3 different categories:
The Purple Buttons will provide you with a larger edit box to enter Long Text Entries.
Lists and Controlled Vocabularies
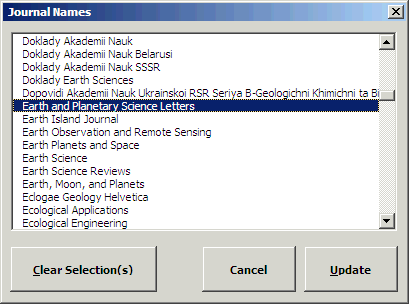
The Light Green and Light Blue Buttons provide you with Shortlists to select a single predefined item or multiple items (see example below). In case of the Light Blue Buttons your selection will create links towards other data tables in the MagIC SmartBook file. To select multiple items simply click on as many records in these lists as required.
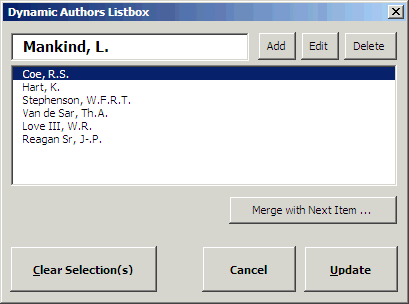
Dark Blue Buttons help you enter names of Authors and Editors in the ER_citations table in the proper format, as expected for the MagIC and EarthRef.org databases. Use the add, edit and delete buttons to enter the correct author and editor information. These Dark Blue Buttons also give interactive dialogboxes to allow you to enter multiple keywords, ocean names, country names, etc.
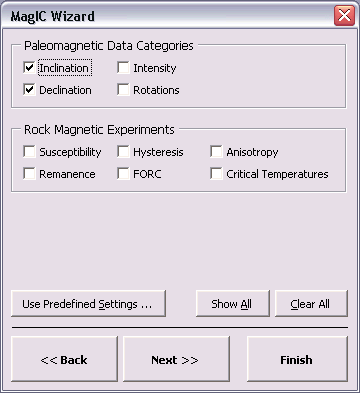
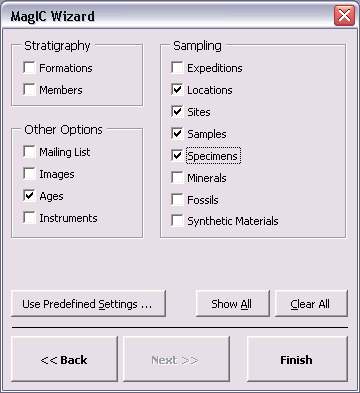
3.5.4 MagIC Wizard
Depending on the type and characteristics of a study, certain fields in the MagIC SmartBook tables may not be relevant and should be hidden. The MagIC Wizard can be launched from the MagIC Toolbar (or Ctrl Shift W) and allows you to customize the SmartBook in three steps. In effect, this tool will temporarily hide some tables and columns from view in Microsoft Excel© depending on the options you selected. Note that the selections made in the Wizard are only applied after clicking the Finish button.
In each of the three wizard steps (see next page an example) you can Check or Uncheck the checkboxes that are relevant to your study. As you will see, these options go from general in the first step to detailed in the following steps. While unchecking these checkboxes, the wizard may uncheck other checkboxes by default. You can always recheck these checkboxes again, if you require that data to appear in your MagIC SmartBook file.

Show All and Clear All Buttons
You can show all fields again by clicking the Show All button in the Wizard, followed by clicking the Finish button. Alternatively, you can click the Clear All button to uncheck all checkboxes.
You can also use Predefined Settings to more easily apply the needed settings. When you click the Use Predefined Settings ... button, another dialogbox appears with options like Classical Directional Study, Classical Intensity Study, Modern Paleomagnetic Study, Modern Stratigraphic or Drill Core Study, and so on.
3.5.5 Navigating a SmartBook
The data in each table may be sorted in an ascending order using up to three columns as keys. To sort on only one column, select any cell in this column and click on the Sort button. To select two or three columns for sorting, push the control key and click on any cell to select the first, second and third column, and then click on the Sort button. The order in which you selected the sorting columns also determines the order in the sorting keys. Note that this action cannot be undone.
With this button you can move to the First Column in the active table without scrolling vertically. You can also use Ctrl Shift Home on your keyboard.
To move multiple columns use the left and right buttons on the toolbar, or hold down the Ctrl Shift keys while using the Arrow Keys on your keyboard. This will allow you to move from one set of columns that are visible in the active Microsoft Excel© window to the next (or previous) set, showing you at least one or two columns overlap. These actions do not cause any vertical scrolling.
With this button you can move to the Last Column in the active table without scrolling vertically. You can also use Ctrl Shift End on your keyboard.
Use this menu to navigate between different Tables in the active MagIC SmartBook file. This pull down menu will be automatically updated every time you switch between different SmartBooks using the SmartBooks toolbar menu (see below).
You can switch between different MagIC SmartBook files using the SmartBooks toolbar menu. If you activate another file through this menu the Tables menu (see above) will be automatically updated.
3.5.6 Text Tools
Select the cells to which you want to add some text or which ones you which to remove or overwrite with some other text, in batch mode. Select the Add Text Tool option from the Text Tools menu. In this tool first type the Text to add ... and then select the Action you want to perform on the right hand side. Apply these settings by clicking on the Start button. Note that this function cannot be undone.

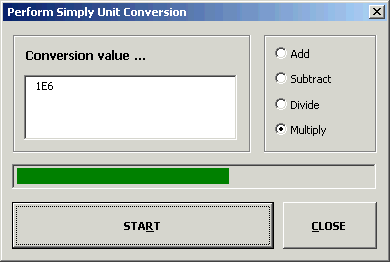
Select the cells on which you want to perform some simple conversions. Then select the Number Conversion Tool option from the Text Tools menu. Type in the Conversion value ... and select one of the actions on the right hand side. Click on the Start button to start applying the conversions. You only can perform one operation at a time.
Select the cells from which you want to remove all spaces. Select the Remove All Spaces option from the Text Tools menu. Note that this function cannot be undone.
Select the cells from which you want to remove extra spaces only. Select the Remove Extra Spaces Only option from the Text Tools menu. This function will remove all Double Spaces and any existent Leading and Trailing Spaces. Note that this function cannot be undone.
Select the cells from which you want to remove all characters with the exception of numbers. Select the Remove All Characters option from the Text Tools menu. This function will remove all Non-Numeric Characters, except for the "-" (minus) and "." (period) symbols, so that it leaves only numeric values. It will also remove all Spaces. Note that this function cannot be undone.
Remove Parentheses and Brackets
Select the cells from which you want to remove all parentheses and brackets. Select the Remove Parentheses and Brackets option from the Text Tools menu. This function will remove all the "( )", "[ ]" and "{ }" symbols. Note that this function cannot be undone.
Select the cells from which you want to remove strange symbols. Select the Remove Strange Symbols option from the Text Tools menu. This function will remove the "~!@#$%^&*_`'|<>? =" symbols and the "tab" character. Note that this function cannot be undone.
Select the cells from which you want to remove line feeds and carriage returns. Select the Remove Line Feeds option from the Text Tools menu. Note that this function cannot be undone.
Select the cells for which you want the text to appear in all lower case. Select the Make All Lower Case option from the Text Tools menu. Note that this function cannot be undone.
Select the cells for which you want the text to appear in all upper case. Select the Make All Upper Case option from the Text Tools menu. Note that this function cannot be undone.
Select the cells for which you want the text to appear in normal case, meaning that only the first letter of the text will appear in upper case, while the remainder will appear in lower case. Select the Make Normal Case option from the Text Tools menu. Note that this function cannot be undone.
Select the cells for which you want the text to appear with each word having normal case. This means that the first letter of each word in the text will appear in upper case, while the remainder of these words will appear in lower case. Select the Make Every Word Normal Case option from the Text Tools menu. Note that this function cannot be undone.
3.5.7 MagIC Help Menu
Select the Metadata and Data Model option from the MagIC Help menu to launch your browser and to review the current metadata and data definition. When entering this web page you will first see an overview of all Tables that define the MagIC SmartBook files. Click on a Table Name to view the definitions of the Records (columns) that define these tables, including short explanations and examples. Note that this function is equivalent to following the http://earthref.org/MAGIC/metadata.htm link. On this web form you can also do a free text search.
Select the Method Codes option from the MagIC Help menu to launch your browser and find a listing of Method Codes that currently are in use. On this page you will find a list of method types (or groups) for which we have defined codes. Please click on one of these method types to retrieve a list of relevant Method Codes and their definitions. Note that this is a dynamic list. With every new version, new Method Codes may have been added to the system, and will show up in these listings. This function is equivalent to following the http://earthref.org/MAGIC/methods.htm link. On this web form you can also do a free text search.
Select the Instrument Codes option from the MagIC Help menu and find a listing of Instrument Codes that currently are in use in the MagIC Database. Please click one of these codes to view their definitions. Note that this is a dynamic list. Every time a user adds new data, new Instrument Codes may have been added to the system, and will show up in these listings. This function is equivalent to following the http://earthref.org/MAGIC/instruments.htm link. On this web form you can also do a free text search.
Select the Controlled Vocabularies option from the MagIC Help menu to find a listing of all Keywords that can be used when entering your data using the MagIC Console Software. On this page you will find a listing of Controlled Vocabularies for which we have defined keywords. Please click on one of the listed vocabularies to retrieve a list of (optional) keywords. This function is equivalent to following the http://earthref.org/MAGIC/shortlists.htm link. On this web form you can also do a free text search.
See also ...
Contents MagIC Chapter 3 MagIC Console Software Section 3.1 Introduction to the Standardized MagIC Data Format Section 3.2 Entering New Data Section 3.3 Special Cases Section 3.4 Examples Section 3.7 Known Bugs and Workarounds