MagIC Help Library |
|||
MagIC Help Library |
|||
3.5.1 Operations Menu
To open a new MagIC SmartBook file, choose the New File ... command (or ctrl-N) in the Operations menu. In a dialogbox you will be asked to Save the SmartBook File under your name of choice. The NewFile.xls is a default name that you can overwrite, as necessary. When clicking on the Save button, a new and empty MagIC SmartBook is created with 30 predefined tables (worksheets).

To open a MagIC SmartBook, choose the Open Existing File ... command (or ctrl-O) in the Operations menu. In a dialogbox you will be asked to browse and select the SmartBook file you would like to re-open in the console software.
Select the Close ... or the Close All ... commands in the Operations menu to close the active MagIC SmartBook file(s). Upon closing the console software will ask you to save the file(s) first.
Click the Save ... command (or ctrl-S) in the Operations menu to save the active MagIC SmartBook file. This command has the same functionality as the Save button on the left-hand side of the toolbar itself. Clicking Ctrl Shift and the Save button [Windows platform only] will save the SmartBook file after cleaning up and reformatting all tables.
Click the Import Data Files ... command (or ctrl-M) in the Operations menu to import Standard MagIC Text Files with data to include in the SmartBook tables. An Import Data Files dialogbox appears in which you can browse for these standard text files. You can select multiple text files by holding down the Ctrl or Shift keys [Windows platform only]. When clicking on the Open button, the selected file(s) will be opened and the data will be imported into the MagIC SmartBook tables.
If the data in the Standard MagIC Text File to import don't have the expected format, an error message will appear. Note that data in a column with a misspelled Oracle Name will be ignored while importing the data. The software will give you an error message.

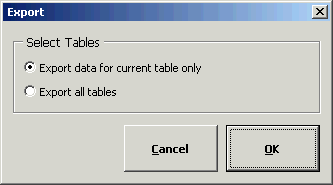
Click the Export command (or ctrl-E) in the Operations menu to export Standard MagIC Text Files. You will be asked to export data for the current (active) table only, or to export all tables in the entire MagIC SmartBook file. All data will be exported into a single tab delimited text file with your chosen file name.
To automatically Import data and immediately Prepare for Uploading (see above) choose the Batch Processing ... command from the Operations menu. You will be asked to select one or more Standard MagIC Text File(s) [multiple files are only allowed on the Windows platform] after which the data processing starts without any user interaction. If errors occur during the five Data Checks they will not cause a prompt, but instead they will be written to an Error Log. This is an efficient option if you prepare Standard MagIC Text Files outside of the MagIC Console Software and you only want to pass your data through the console to make them ready for uploading. Since all checks get performed without any interrupting for your entire data contribution, the error logs give you a good overview where you should improve on your data and metadata collection.
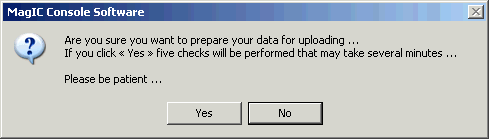
When all data have been entered in the MagIC SmartBook choose the Prepare for Uploading command (or ctrl-F) in the Operations menu. You will be asked for be asked for a confirmation. If you click the Yes button, five Data Checks will first be performed before the data is saved in a single tab delimited text file. This may take several minutes, depending on the complexity and the amount of data stored in the SmartBook. Clicking the No button will cancel this action.
The five Data Checks include a SmartBook integrity check, a check for orphaned data, a general data check, a specific data check (for longitudes, citation style, data ranges, etc.) and an integrity check for all related data fields. If one of these checks returns an error, the Prepare for Uploading command will ask you to edit (or add) certain data and metadata. If you do not edit the particular field at this stage, you will cancel the Prepare for Uploading action.
After the succesfull completion of the Prepare for Uploading command you are ready to upload your data on the MagIC Website. Goto http://earthref.org/MAGIC/upload.htm or click on the Upload Into MagIC Database command in the Operations menu.
See also ...
Contents MagIC Chapter 3 MagIC Console Software Topic 3.5.2 Special Menu Topic 3.5.3 Data Entry and Editing Dialogbox Topic 3.5.4 MagIC Wizard Topic 3.5.5 Navigating a SmartBook Topic 3.5.6 Text Tools Topic 3.5.7 MagIC Help Menu